[Guide] Prepare Raspberry Pi for boot from USB/NVMe

Introduction:

With the Raspberry 4 version B released in 2019 SBC community gained capability of booting from USB attached storage in 2020. Raspberry Pi 5 released in 2023 with native implementation of PICe presented new possibility of making Volumio better.

The groundwork has been laid in the Community thread 64283 where a basic question, if the boot from MVME M.2 is even possible, is discussed. New question - can boot weld to MicroSD be liberated? Continue reading…

Preparations:

Make sure you are running the latest version of Raspberry Pi OS on your Raspberry Pi 4B or 5. You can download it from Raspberry Pi. You will also need to make sure the OS is all up to date.

sudo apt update
sudo apt full-upgrade
sudo reboot

1. Check current running version of bootloader EEPROM image.

vcgencmd bootloader_version

USB booting was supported starting with version 9-03-2020. You should see that version 16-02-2024 or later is installed. Now check to see if there is an update available.

sudo rpi-eeprom-update

image

You should see that the bootloader is up-to-date. By default you will only see updates from the “default” directory. Default updates are not released too often. Even if you see UPDATE AVAILABLE you can ignore it as we are going to check for an update in a more frequently released channel or directory called “latest”.

2. Upgrade to the newer “latest” EEPROM version.

You will need to change the firmware directory from critical or stable to latest to find the latest updates. To do this, you need to edit a file called /etc/default/rpi-eeprom-update.

sudo nano /etc/default/rpi-eeprom-update

image

Change the word “critical” or “stable” to “latest” and save the file.
Check once again for an eeprom update and you should notice a newer version.

sudo rpi-eeprom-update

image

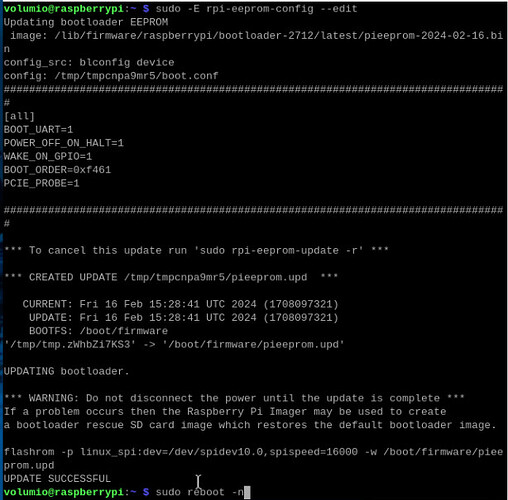
3. Apply the update and reboot.

sudo rpi-eeprom-update -a
sudo reboot -n
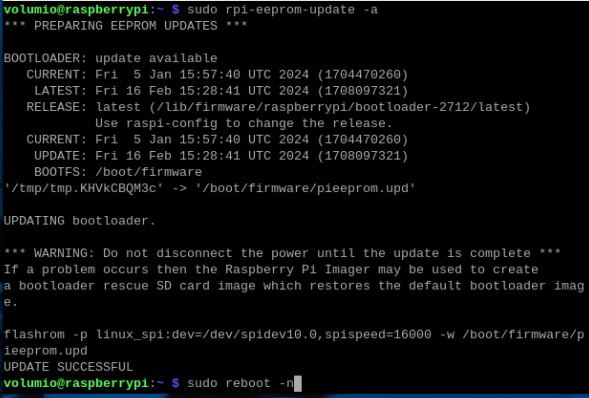
image

You can check the running eeprom version again to ensure the correct version.
vcgencmd bootloader_version
ALL UP-TO-DATE!

4(a). Check BOOT ORDER configuration - Raspberry Pi 4B.

sudo rpi-eeprom-config

Take note of the BOOT_ORDER code. The defualt code is 0xf41 and is read right to left to determine the boot order.
1 = Check SD card
4 = Check USB drive
f = Start again
This boot order is exactly what we want. If the boot order code is anything other than 0xf41, you can change the boot configuration using this command.

sudo -E rpi-eeprom-config --edit
BOOT_ORDER=0xf41

image

Write your changes (Ctrl-O) and exit (Ctrl-x)
Reboot Raspberry Pi
sudo reboot

4(b). Check BOOT ORDER configuration - Raspberry Pi 5.

sudo rpi-eeprom-config

Take note of the BOOT_ORDER code. The defualt code is 0xf41 and is read right to left to determine the boot order.
1 = Check SD card
4 = Check USB drive
f = Start again
This boot order is not what we want. If the boot order code is anything other than 0xf461, you can change the boot configuration using this command.

sudo -E rpi-eeprom-config --edit
BOOT_ORDER=0xf461

image

1 = Check SD card
6 = Check PCIe NVME
4 = Check USB drive
f = Start again

In addition, you need to instruct your Raspberry Pi 5 to enumerate and use PCIe by adding after BOOT_ORDER: PCIE_PROBE=1. Please pay attention to the line orders.

sudo -E rpi-eeprom-config --edit
BOOT_ORDER=0xf461
PCIE_PROBE=1

image

Write your changes (Ctrl-O) and exit (Ctrl-X)
Reboot Raspberry Pi
sudo reboot

5. USB boot power re-cycle

During USB mass storage boot, power to the USB ports A is switched off for a short time to ensure the correct operation of USB mass storage devices. Most U-DISK devices work correctly using the default setting. Unfortunately there is a group of USB/SSD devices where defaults will prevent reboot or OTA upgrade on booted from USB Raspberry Pi 4B and Raspberry Pi 5 devices. This require a bit of experimenting with USB_MSD_PWR_OFF_TIME and USB_MSD_STARTUP_DELAY parameters.
Example:

  • Setting USB_MSD_PWR_OFF_TIME=0 will prevent power to the USB ports being switched off during USB mass storage boot. A permissible range is in milliseconds between 0 and 5000 (Default: 1000 → 1 second).
  • Setting USB_MSD_STARTUP_DELAY=1000 delays USB enumeration for the given timeout after the USB host controller has initialised. A permissible range is in milliseconds between 0 and 30000 (Default: 0 → 0 second).

Usage examples:

Append USB_MSD_PWR_OFF_TIME=0 before BOOT_ORDER=0x.

sudo -E rpi-eeprom-config --edit
USB_MSD_PWR_OFF_TIME=0
BOOT_ORDER=0xf41

image
(Screenshot from Raspberry Pi 4B)

Append USB_MSD_PWR_OFF_TIME=1000 before BOOT_ORDER=0x.

sudo -E rpi-eeprom-config --edit
USB_MSD_PWR_OFF_TIME=1000
BOOT_ORDER=0xf41

image
(Screenshot from Raspberry Pi 4B)

Append USB_MSD_PWR_OFF_TIME=1000 and USB_MSD_STARTUP_DELAY=3000 before BOOT_ORDER=0x.

sudo -E rpi-eeprom-config --edit
USB_MSD_PWR_OFF_TIME=1000
USB_MSD_STARTUP_DELAY=3000
BOOT_ORDER=0xf41

image
(Screenshot from Raspberry Pi 4B)

Write your changes (Ctrl-O) and exit (Ctrl-X)
Reboot Raspberry Pi
sudo reboot

6. Use NVMe

The Volumio OS newer than 3.661 official release already have required parameters and you can skip the steps below.

However, if you want to test already attached NVMe with any other Volumio OS release or some other OS, you will need to update /boot/config.txt or /boot/firmware/config.txt with overlays:

dtparam=nvme
dtparam=pciex1_gen=2

Reboot Raspberry Pi
sudo reboot

Also you can experiment and force connection to Gen 3.0 (10 GT/sec)

dtparam=pciex1_gen=3

Shutdown your Raspberry Pi 5. It is ready to boot from USB/NVMe.

Usage, community discussion and further steps:

Description Community thread
Closed Official Volumio OS BETA test Volumio 3 Beta test: New init
Closed Testing Volumio OS with Disk Installer [ALPHA] Raspberry Pi boot from USB/NVMe
NVMe SSD LAB and findings to date PCIe NVMe compatibility

Flash Micro SD card with latest Volumio OS image and use “Install to disk” installer from System menu.

2 Likes
BOOT_ORDER RPi4 Description
0xf41 Try SD first, followed by USB-MSD then repeat (default if BOOT_ORDER is empty)
0xf14 Try USB first, followed by SD then repeat
0xf21 Try SD first, followed by NETWORK then repeat
BOOT_ORDER RPi5 Description
0xf416 Try SD first, followed by USB-MSD, followed by NVMe then repeat (default if BOOT_ORDER is empty)
0xf164 Try USB first, followed by NVMe, followed by SD then repeat
0xf216 Try SD first, followed by NETWORK, followed by NVMe then repeat

The BOOT_ORDER property defines the sequence for the different boot modes. It is read right to left and up to 8 digits may be defined.

Value Mode Description
0x0 SD CARD DETECT Try SD then wait for card-detect to indicate that the card has changed - deprecated now that 0xf (RESTART) is available.
0x1 SD CARD SD card (or eMMC on Compute Module 4).
0x2 NETWORK Network boot.
0x3 RPIBOOT RPIBOOT - protocol that provides a virtual file system to the Raspberry Pi bootloader and GPU firmware. It’s therefore possible to boot Linux.
0x4 USB-MSD USB mass storage boot.
0x5 BCM-USB-MSD USB 2.0 boot from USB Type C socket (CM4: USB type A socket on CM IO board, using bootloader EEPROM from 2020-12-14 onwards).
0x6 NVMe CM4 and RPi5 only: boot from an NVMe SSD connected to the PCIe interface.
0xe STOP Stop and display error pattern. A power cycle is required to exit this state.
0xf RESTART Restart from the first boot-mode in the BOOT_ORDER field i.e. loop
1 Like

[@nerd EDIT - I moved this discussion to the relevant thread]

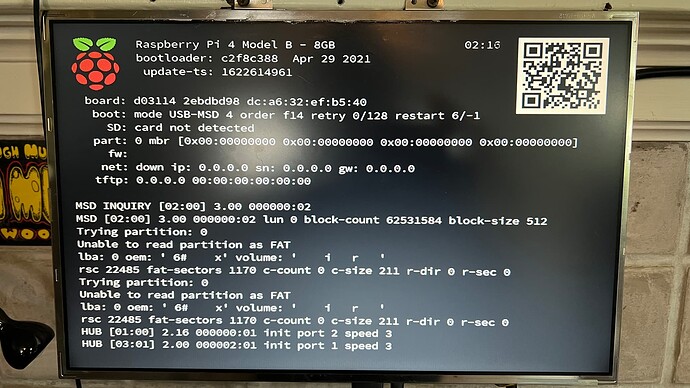
Currently I am booting from a 32gb USB 3.0 (formatted as ExFAT) and runs on Volumio v3.636. Everything works fine except when I restart, I get stuck on the boot screen as picture. I had to unplug the power cable and replug it back and everything is working again. It happens on 2 RPi4s and a RPi5.

Did I do something wrong?

Andy

1 Like

I don’t think you did anything wrong. The picture you shared is from subsequence of boot capabilities check - attempting to boot from network. Upon time-out on network stack the Raspberry Pi will move to the next option. Since bootloader in shared picture shows Apr 29 2021, please revisit your eeprom configuration and:

  1. Upgrade your device eeprom to version 2024-02-16-2711 (Pi4), 2024-02-16-2712 (Pi5) or newer
  2. Set boot order 0xf41 for raspberry Pi 4 (SD Card → USB → Repeat)
  3. Set boot order 0xf461 for raspberry Pi 5 (SD Card → NVMe → USB → Repeat)

Notes on USB devices: Some USB storage devices based on SSD flash require cold start, will not report “Ready” status unless initiated from cold start.

EDIT: Updated #3

1 Like

According to pi5 docs: 4 - USB, 1 - SD, 6 - NVME

1 Like

Of course, in the same docs the boot order is also discussed and in the eeprom configuration they need to be in the reverse order.

1 Like

Thanks for the info. I haven’t update the eeprom of my RPi4s for years. I guess it’s about time. Anyway, I just finished building up a RPi5 with x1001 and a 500gb NVMe and everything works fine.

Andy

2 posts were merged into an existing topic: [ALPHA] Raspberry Pi boot from USB/NVMe

A post was merged into an existing topic: [ALPHA] Raspberry Pi boot from USB/NVMe

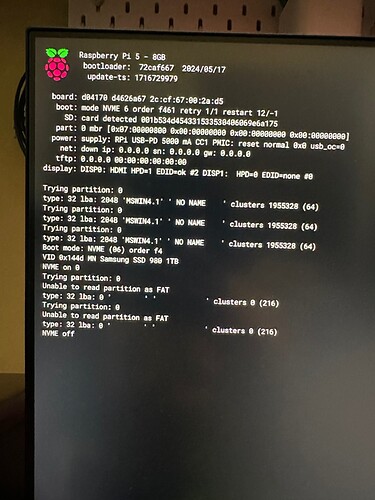
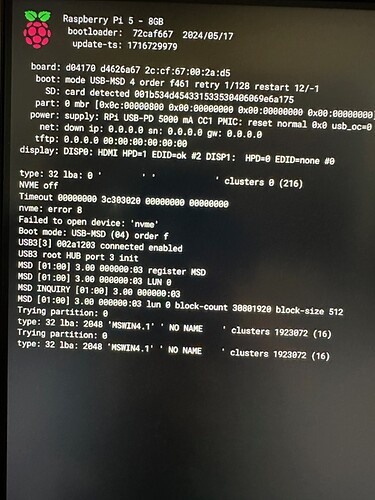
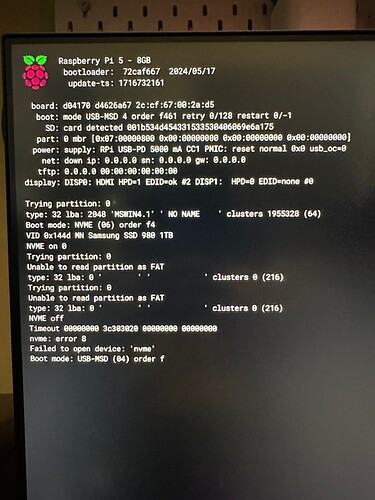
Dear @nerd followed all the steps you shared with Andy but the moment I am shutting donw the RPI OS and inserting the Volumio SD card, this is what I am getting and not sure what mistake I am making here…


Steps Followed ----

  1. Did a clean Volumio Installation on a SD Card.

  2. Then took a separate SD card and installed RPI OS on the same.

  3. Followed all the steps here —

  4. Upgrade your device eeprom to version 2024-02-16-2711 (Pi4), 2024-02-16-2712 (Pi5) or newer

  5. Set boot order 0xf461 for raspberry Pi 5 (SD Card → NVMe → USB → Repeat)

The moment after making the above changes I am shutting RPI OS removing it’s sd card and inserting the SD card with Volumio OS. getting screens like shared and attached.

Please suggest as I want this environment to work upon ----

Dear @nerd followed all the steps you shared with Andy but the moment I am shutting donw the RPI OS and inserting the Volumio SD card, this is what I am getting and not sure what mistake I am making here…


Steps Followed ----

  1. Did a clean Volumio Installation on a SD Card.
  2. Then took a separate SD card and installed RPI OS on the same.
  3. Followed all the steps here —
    [Guide] Prepare Raspberry Pi for boot from USB/NVMe

Reason to have 2 separate SD cards for RPI OS and Volumio is because the commands you metioned below for EEPROM update do not works in Volumio using Terminal, SO I used the RPI oS to make all the relevant chnages and updated you mentioned and than changed the SD card to Volumio bit facing issues as showin the in thre attached images

  1. Edit the EEPROM on the Raspberry Pi 5. sudo rpi-eeprom-config --edit
  2. Change the BOOT_ORDER line to the following: BOOT_ORDER=0xf416
  3. Add PCIE_PROBE to enumerate over the PCIe bus: PCIE_PROBE=1
  4. Press Ctrl-O, then enter, to write the change to the file.

@rajiv.kumar1984

This is quite intriguing. Your MicroSD card flashed with RPI OS boots fine, whilst another flashed with Volumio OS does not. This suggests that there is nothing wrong with the boot order or Rpi 5 itself. Such outcome however, suggests that there is problem either with the second MiroSD card or image flashed. Which Volumio OS image are you flashing to your MicroSD card? Please describe and detail the method.
What happens when you flash Volumio OS to the MosroSD where the RPI OS previously was?

Kind Regards,

Thanks @nerd. The version I am using is 3.694. I am using Rasperry PI imager to write the image on the Samsung card. Any suggestions pls

I am not sure if the Pi Imager works well with a standard Volumio OS flashing parameters. Please flash with likes of Rufus or Etcher, if with native dd command is not possible. As before - it will greatly help if you could describe your flashing process in details.

Kind Regards,

1 Like

Hey @nerd it’s very much similar to Balena Etcher which is more like automated. On a Windows PC I open the program - RPI Inager and it ask to choose the RPI model and than OS image and then write on the SD card

Hey @rajiv.kumar1984

As basic as may sound, are you decompressing (unzip) image prior flashing?

1 Like

oK @nerd let me decompress the file and use the actual image with a fresh memory card to write Volumio OS and than shall I take the below Steps ===

  1. Post Preparing a new memory card with Volumio OS, prepare a similar memory card with Raspberry OS.

  2. Insert the Raspberry OS into the RPI5 and then follow the complete guide here (Please let me know if I am missing anything here) –

a. Run the below commands -

sudo apt update
sudo apt full-upgrade
sudo reboot

b. Check current running version of bootloader EEPROM image.

vcgencmd bootloader_version
sudo rpi-eeprom-update

c, Check that the bootloader is up-to-date.

d. Upgrade to the newer “latest” EEPROM version.

Change the firmware directory from critical or stable to latest to find the latest updates. To do this,we will need to edit a file called /etc/default/rpi-eeprom-update.

sudo rpi-eeprom-update

e. Check once again for an eeprom update and we should notice a newer version.

sudo rpi-eeprom-update

f. Apply the update and reboot.

sudo rpi-eeprom-update -a
sudo reboot -n

g. Check BOOT ORDER configuration - Raspberry Pi 5.

sudo rpi-eeprom-config

h. Now for the boot order I want to use the SD card in the first line followed up by the NVME. For that If I am correct, we need to make the below changes exactly —

sudo -E rpi-eeprom-config --edit
BOOT_ORDER=0xf461

***Not sure about the reason for the below step please —

In addition, you need to instruct your Raspberry Pi 5 to enumerate and use PCIe by adding after BOOT_ORDER: PCIE_PROBE=1. Please pay attention to the line orders.

sudo -E rpi-eeprom-config --edit
BOOT_ORDER=0xf461
PCIE_PROBE=1

Finally, Write your changes (Ctrl-O) and exit (Ctrl-X)
Reboot Raspberry Pi
sudo reboot

Now, change the SD Card with RPI OS to SD Card with Volumio OS to ensure that the boot happens with the SD card and install a fresh copy of Voumio OS post which transfer the installation from SD card to NVME and remove the SD card. Than the boot will automatically happen from NVME card. Is this a correct assumpation @nerd.

Also, when to exactly use the below steps —

Use NVMe

If you want o test already attached NVMe you will need to update /boot/config.txt or /boot/firmware/config.txt with overlays:

dtparam=nvme
dtparam=pciex1_gen=2

Reboot Raspberry Pi
sudo reboot

Also you can experiment and force connection to Gen 3.0 (10 GT/sec)

dtparam=pciex1_gen=3

Shutdown your Raspberry Pi 5. It is ready to boot from USB/NVMe.

Hey @rajiv.kumar1984

When using Pi Imager the key piece is to unzip downloaded firmware and flash .img file, not .zip.
The plan is sound and let me comment on the questions you have:

You need to upgrade eeprom only once, as most of the RPi 5 were shipped with 112023 stamp firmware, which is known to have issues. If you have your board with firmware from April 2024 or newer, there is no functional need, leaving upgrade to your discretion. (My personal preference is to upgrade to the lasted prior every testing cycle.)

In this step the PCIe physical interference of your Raspberry Pi 5 is being enabled. Without this step, M.2 NVMe operations will not be possible.

The RPI OS is temporary only to prepare the SBC: enable and use PCIe with the attached NVMe. Once you complete preparations, you can use the MicroSD card in any way you like it.

Once you boot your SBC from the MicroSD card, after initial setup, you will find in the menu system option “Install to NVMe”, which will do as the option says. Follow the prompts. Instead of restarting I would use shutdown, just to cleanly remove MicroSD without corrupting it mid process.

With the Volumio OS downloaded from the TEST release channel and production channels in th future, these steps are no longer needed. You will find the parameters prepared at their default values inside of volumioconfig.txt file.

Kind Regards,

How to check this buddy - as most of the RPi 5 were shipped with 112023 stamp firmware, which is known to have issues. If you have your board with firmware from April 2024 or newer, there is no functional need, leaving upgrade to your discretion. (My personal preference is to upgrade to the lasted prior every testing cycle.)

Hey @rajiv.kumar1984

With first steps of this thread.

Ensure that:

Kind Regards,