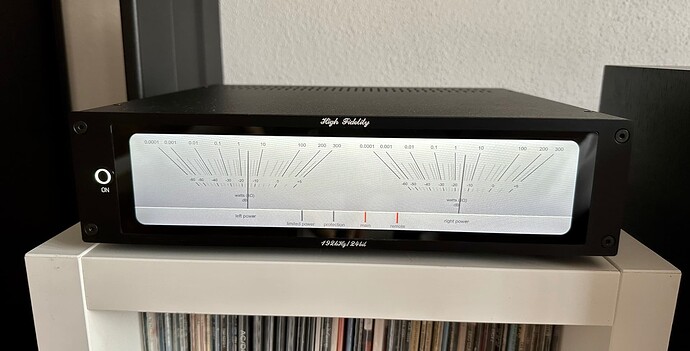
Yes 
What a beauty! 

Thank you so much for getting back and let me go through the list and files and get onto it!
By the way, did you also had to provide design for the back panel and had it cut or did you do it yourself.
I was going to ask you about infrared, but saw your comment on the other forum 
Hi. Did you set something in Now-Playing or is it the default? And that button just puts it to sleep?
@mchief Did you drill the hole for the display yourself? Looks almost perfect.
I wonder whether I should also make the display flush on my project, with the risk that it will fail due to the slightly rounded corners, or whether I should not make the display flush and place it behind the front panel and, if necessary, scrape off the front panel from the inside so that the plate where the display sits is about 2mm and then apply a slightly thicker protective film to make it flush again.
Default 
I had the hole made here!
Schaeffer
Hello mchief,
how thick is the front panel?
The transition edge to the display looks very narrow.
3mm
he inserted the display flush and built a bracket behind it. You can see it quite well in the first pictures. He seems to have created the holder himself with a 3D printer.
I think I will do it the same way or try to do without the front panel completely and use the screen as a front panel. For that I would probably have to bend a case out of aluminium myself. Let’s see, I haven’t got that far yet.
I saw the holders on the back. the transition from the front panel to the display looks very thin for a 3mm front panel.
Yes, I also like a front with only a display. The rose B150, for example, has this. with a size of about 12.3 or 12.6 inches, it will be a pretty big case.
I am also in the process of developing such a system for myself.
Hi, can you help me with dimension of face plate and the 4 holes in the corners, including the distance to the limits of faceplate.
Thank you
See post #41
Did you order a new faceplate or used the one delivered with the case?
I used the one delivered with the case!
I’d like to compliment you on the beautiful execution and cleanliness. You too, as in my case, have made use of elements produced with 3D printing.
Your project resembles mine, in the very first stage when I used only the Raspberry, but I immediately understood its limits, first of all the power supply. Another starting point was choosing the best way to make the most of my audio chain, in which there is a quality vintage multi-channel amplifier and floorstanding speakers. So I temporarily opted for a PC PSU, which has both 12V and 5V power and supplies and a sound card with DIGI + pro digital output. These are useful for adjustable speed (noise) fans if needed and for adding a couple of storage drives. At my start your device lacks digital optical audio in case you would like to have a higher quality external DAC do the job and dhmy output for an external monitor, you have a lot of space. Congratulations again.
Hi,
i am reading this thread for a Long Time now! Awesome streamer!
Do you still have the 3d Printing image file?
I wonder How you connected the Power Button and which Power Button do you use? Simply Connect to gpio of raspi/Dac, if so, which gpios to use?
Any Settings to handle on/off with button?
Thx a lot!
I don’t think you can build a good design using all the parts produced by a 3D printing machine. I also used sheet metal parts, especially for the panel connectors
Oh sorry just wanted the 3d printing file for the Display holders.
I also have this case. Forgotten to Write which 3d file i wanted to get.
