I’ve been developing a new plugin for Volumio called Quadify, which integrates a Python backend to give Volumio a full hardware interface and visual layer. It’s now packaged as a proper Volumio plugin (no more patchwork scripts), and I’m looking for testers.
Display
Support for SSD1322 SPI OLED displays (256x64 resolution)
Adjustable rotation and brightness
Multiple screen modes: playback info, clock, and spectrum visualiser
Controls
Button and LED handling via MCP23017 GPIO expander
Configurable mappings for playback control and navigation
LED feedback linked to playback states and power management
Remote Control
Built-in IR remote integration via LIRC
Pre-configured remote profiles, with room for custom setups
Visualisation
Real-time CAVA spectrum visualiser (toggle on/off in the plugin UI)
Integrated into the OLED display for live audio feedback
Safety & Power Management
Clean shutdown and restart integration (supports Pimoroni On/Off SHIM and similar)
Automatic LED-off routine during shutdown
Pre-/post-hook support for custom shutdown actions
Installation
Clone the repo and install the plugin directly on Volumio:
git clone https://github.com/theshepherdmatt/Quadify-Plugin.git
cd Quadify-Plugin
volumio plugin install
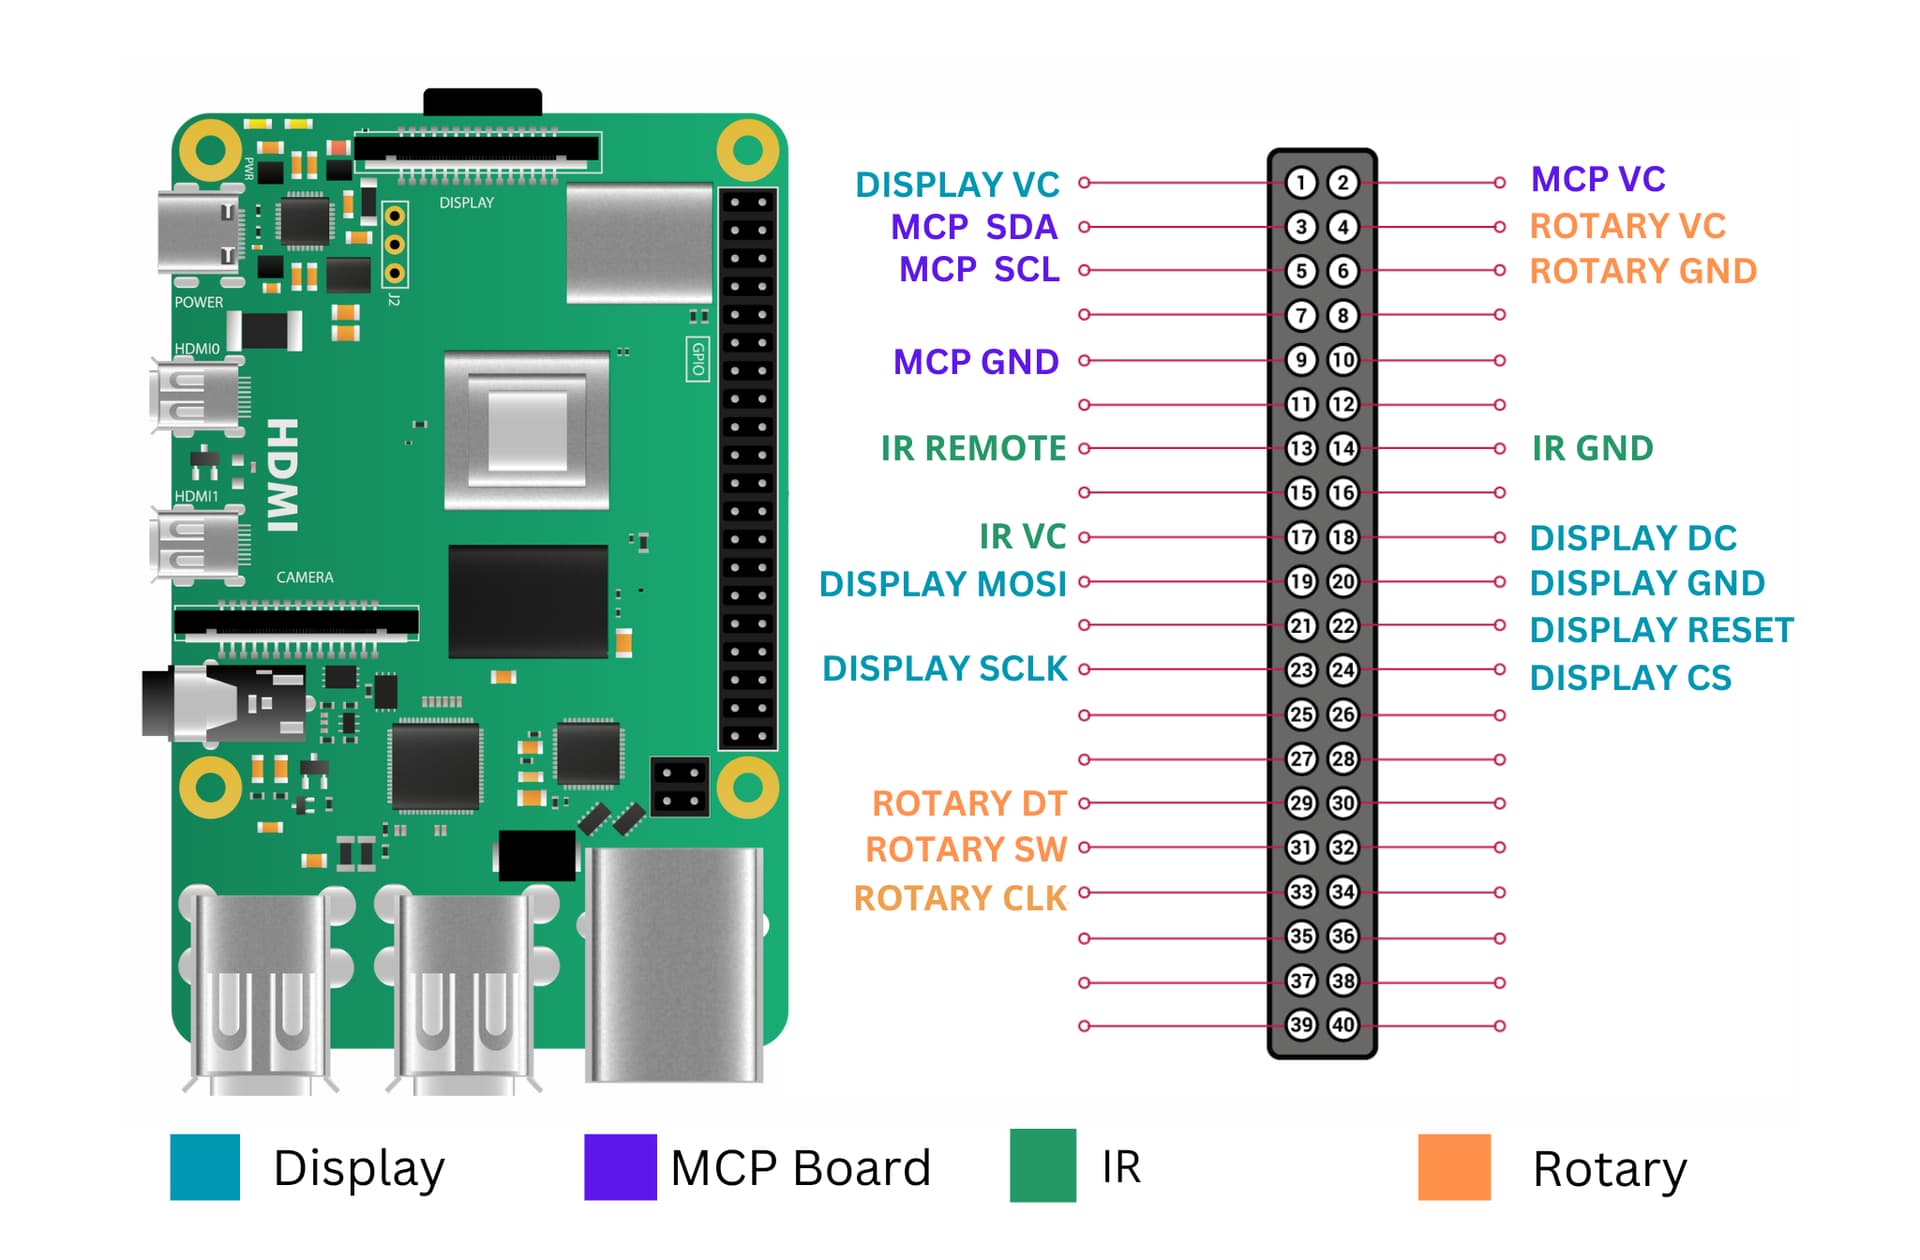
Cheers for the feedback, much appreciated mate. You’re absolutely right, adding proper hardware schematics would make things much clearer for anyone trying to reproduce the setup.
I’ll put together diagrams covering: Led resistor values with Vf and target current assumptions. Mcp23017 wiring (address pins, INT pins, pull-ups). Button/Leds matrix layout including any diodes
I’ll add these into the repo so adopters have a safe, verified reference to work from.
I’ve been looking at your plugin. It looks fantastic and very sophisticated.
I’m in the process of building my own streamer (RPi4 + IanCanada huts). I’ve decided to use a 256x64 display; SSD1322.
However, I will not need all the fantastic features of your creation. To be honest, I would be very interested in using only the Playing Screen (Oscilloscope – Modern Visualiser). Is it possible to configure it this way?
Dear Matt I would like to give it a trial. As you know I already have the display.
Your Quadify Homepage explains most things.
As mentioned is there a schematic available?
How do you handle Switch bouncing on Rotary encoder and switches?
What’s about the resistors for the LEDs and switches?
And will it yet work with Raspberry Pi 5 (not a No-Go )
Cheers Benjamin
Yes, that’s possible. If you only want the Modern Visualiser screen, just toggle off the other features in the plugin settings. Quadify will then persist in the Modern display, and nothing else will run in the background. The SSD1322 is fully supported (256×64, rotation etc.), so it should work exactly as you’re planning. Will you be using the menus etc?
Great to hear you’d like to give Quadify a trial!
• Schematic: I haven’t published a full schematic yet, but the plugin README and assets cover most of the wiring basics. I’ll be adding a proper diagram soon with the MCP23017 pinout, LED resistors, and button wiring so it’s easier to replicate safely.
• Switch bounce: handled in software. The rotary encoder and button inputs are debounced in the Python backend, so extra hardware debounce isn’t required unless you prefer it.
• LED resistors: standard current-limiting resistors are fine, based on your LEDs’ forward voltage and target current (typically 330–470 Ω for 3.3 V logic). I’ll include suggested values in the schematic update.
• Raspberry Pi 5: at present the plugin won’t run properly on Pi 5. I’m waiting on Volumio’s Bookworm release before testing and confirming support.
• Buttons & LEDs: I haven’t tried this yet, but if you disable Quadify’s button/LED handling you should be able to use the Volumio GPIO plugin alongside. Quadify relies on Volumio CLI commands for playback control, so play/pause/next etc. should still work fine.
Cheers,
Matt
PS: The Quad FM4 that I originally built Quadify for uses an 8-button matrix. For your setup I’d recommend disabling the buttonsleds toggle and giving the GPIO plugin a try.
Very good idea to wait with Raspi 5 for Bookworm. Then you don’t need to do the work twice.
I really like the 8 buttons in Quadify, and that’s one of the reasons I like your project.
A request:
It would be great if users could insert whatever they want into Volumio playlists, and then trigger those playlists directly with the Quadify buttons.
Right now, I have 3 switches that can only play/pause saved playlists. In these playlists I can store Webradio streams. But to make this work, I currently have to manually edit the GPIO Buttons plugin config file.
By the way, maybe also interesting for your logic: I learned that play/pause triggers for streams (like Webradio or Spotify) behave differently than for normal file playback.
That’s a very good point about waiting for the Pi 5 with Bookworm, no sense doing the work twice.
I’m glad you like the buttons in Quadify. Just to clarify, the 8 you see in the code are actually a 4×2 matrix (4 rows, 2 columns), not 8 independent buttons.
Quadify itself works as a listener: when Volumio goes into play, it switches to the playback screen; when it goes into pause, it drops back to the clock or home screen. If you’re in clock mode and press the rotary switch, it’ll bring up the menu, and if you’re in playback, the same button just toggles play/pause.
So in practice, you could also just use the GPIO plugin, as long as the button is triggering “play,” Quadify’s screen will change accordingly.
Thanks a lot for the explanation.
I didn’t think about the menu because it would require additional buttons on the front panel.
But you’ve given me an interesting idea to think about.
Basically, I was only planning on a display with information about the songs being played, but your plugin gives a much better aesthetic effect for the displayed content.
I’ll probably test it next month when I order the rest of the modules from IanCanada.
I installed your plug-in on Volumio 3.874 (RPi4B). Everything went smoothly (it would not install on Volumio 4.069).
The plugin works flawlessly.
Unfortunately, there are small interruptions during music playback. I have Transport Pi Digi II and IsolatorPi III from IanCanada. SSD1322 SPI OLED displays (256x64 resolution) are connected to GPIO on the non-isolated side.
Do you have any experience with this issue? Can it be eliminated?
Hey mate, I’ve updated the plugin, but I don’t have the OLED and other hardware here to fully test it. The new code installs fine with no errors, but I can’t confirm the display functions.
If you’re brave enough to give it a try, I’d really appreciate it. Just make sure you back up your current setup or use a separate SD card before testing.
Hi Matt, I tried your plugin on Volumio 3.874 (RPi4B) and then installed it on Volumio 4.071 (RPi4B). On version 3.874 the installation goes without any problems, however if you want to disable the plug-in for buttons and LEDs, that setting always goes back to the default (on) which I just don’t like. For everything else, I didn’t see any downsides. On Volumio version 4.071, the installation still does not go through.
Greetings
Hello. I didn’t wait for a response and decided to try installing it, but I got an error. Please tell me how to fix it. Raspberry Pi4 2Gb, Volumio ver. 4.073, OLED 128x64 SPI
Compressing the plugin
Plugin succesfully compressed
Progress: 10
Status :Загрузка плагина
nloading plugin at http://127.0.0.1:3000/plugin-serve/quadify.zip
Progress: 30
Status :Создание места установки
Создание места установки
Progress: 40
Status :Распаковка плагина
Распаковка плагина
Progress: 45
Status :Проверка того, что плагин подходит для данной версии Volumio The plugin can be used with this version of Volumio
Проверка того, что плагин подходит для данной версии Volumio The plugin can be used with this version of Volumio
Progress: 50
Status :Проверка наличия дубликатов плагинов
Проверка наличия дубликатов плагинов
Progress: 60
Status :Копирование плагина в местоположение
Копирование плагина в местоположение
Progress: 70
Status :Установка необходимых утилит
Установка необходимых утилит
Progress: 70
Status :Произошла ошибка при установке плагина Error
[Quadify Install] Detected Raspberry Pi model: Raspberry Pi 4 Model B Rev 1.2
Progress: 70
Status :Установка необходимых утилит
[Quadify Install] Detected Raspberry Pi model: Raspberry Pi 4 Model B Rev 1.2
Progress: 70
Status :Произошла ошибка при установке плагина Error
Reading package lists…
Progress: 70
Status :Установка необходимых утилит
Reading package lists…
Progress: 70
Status :Произошла ошибка при установке плагина Error
Building dependency tree…
Progress: 70
Status :Установка необходимых утилит
Building dependency tree…
Progress: 70
Status :Произошла ошибка при установке плагина Error
Reading state information…
Progress: 70
Status :Установка необходимых утилит
Reading state information…
Progress: 70
Status :Произошла ошибка при установке плагина Error
0 upgraded, 0 newly installed, 0 to remove and 1 not upgraded.
Progress: 70
Status :Установка необходимых утилит
0 upgraded, 0 newly installed, 0 to remove and 1 not upgraded.
Progress: 70
Status :Произошла ошибка при установке плагина Error
[Quadify Install] Installing system dependencies…
Progress: 70
Status :Произошла ошибка при установке плагина Error
$ apt-get update
Progress: 70
Status :Установка необходимых утилит
[Quadify Install] Installing system dependencies…
Progress: 70
Status :Установка необходимых утилит
$ apt-get update
Progress: 70
Status :Произошла ошибка при установке плагина Error
Hit:1 Index of /debian bookworm InRelease
Progress: 70
Status :Установка необходимых утилит
Hit:1 Index of /debian bookworm InRelease
Progress: 70
Status :Установка необходимых утилит
Hit:2 Index of /raspbian bookworm InRelease
Progress: 70
Status :Произошла ошибка при установке плагина Error
Hit:2 Index of /raspbian bookworm InRelease
Progress: 70
Status :Произошла ошибка при установке плагина Error
Hit:3 https://deb.nodesource.com/node_20.x nodistro InRelease
Progress: 70
Status :Установка необходимых утилит
Hit:3 https://deb.nodesource.com/node_20.x nodistro InRelease
Progress: 70
Status :Произошла ошибка при установке плагина Error
Reading package lists…
Progress: 70
Status :Установка необходимых утилит
Reading package lists…
Progress: 70
Status :Произошла ошибка при установке плагина Error
$ apt-get -y -o Dpkg::Options::=–force-confdef -o Dpkg::Options::=–force-confold install python3 python3-pip python3-venv python3-dev i2c-tools python3-smbus lirc lsof libjpeg-dev zlib1g-dev libfreetype6-dev libgirepository1.0-dev libcairo2-dev libffi-dev build-essential libxml2-dev libxslt1-dev libssl-dev python3-gi python3-cairo gir1.2-gtk-3.0 pkg-config libopenjp2-7 libtiff5 liblcms2-dev libwebp-dev
Progress: 70
Status :Установка необходимых утилит
$ apt-get -y -o Dpkg::Options::=–force-confdef -o Dpkg::Options::=–force-confold install python3 python3-pip python3-venv python3-dev i2c-tools python3-smbus lirc lsof libjpeg-dev zlib1g-dev libfreetype6-dev libgirepository1.0-dev libcairo2-dev libffi-dev build-essential libxml2-dev libxslt1-dev libssl-dev python3-gi python3-cairo gir1.2-gtk-3.0 pkg-config libopenjp2-7 libtiff5 liblcms2-dev libwebp-dev
Progress: 70
Status :Произошла ошибка при установке плагина Error
Reading package lists…
Progress: 70
Status :Установка необходимых утилит
Reading package lists…
Progress: 70
Status :Произошла ошибка при установке плагина Error
Building dependency tree…
Progress: 70
Status :Установка необходимых утилит
Building dependency tree…
Progress: 70
Status :Произошла ошибка при установке плагина Error
Reading state information…
Progress: 70
Status :Установка необходимых утилит
Reading state information…
Progress: 0
Status :Произошла ошибка при установке плагина Error
Произошла ошибка при установке плагина Error
Failed to Install Plugin
Dear Matt,
You’ve created a great plugin. Probably the best for OLEDs.
I’m only using the display for now and I really like it.
I’ll try the encoder as soon as I buy and connect it.
Installation on Volumio 3 was without any problem.
If possible, I would like to express my wishes/comments.
The most important thing I would like to ask is the ability to change the port numbers to which the encoder and other peripheral is connected. The same way it is done for the input port of the IR remote.
The problem is that the ports to which the encoder is currently connected, are used to as output ports of Hifi Berry Digi+ PRO for switch the frequency grid and sampling rate. Therefore, hardware conflicts are possible.
The second big problem is that it is impossible to disable buttons and LEDs as it already mentioned in previous posts.
There are other visual details, but they are less important.
Installation went smoothly from the repository, plugin accessible from Volumio 3.xxx.
I ordered the parts you recommended, OLED screen and interface add-on, and I’m going to test them on a Pi3 (my Pi5 burned out more than Ethernet).
Would it be possible to supplement your explanations with pinouts, for example?
Do you think it’s possible to control the color and/or size of the screen?
Yes, this is a known problem for your hifiberry as it has conflicting GPIO, I think mainly the sda and scl pins which are used for the mcp23017 board. Unfortunatly the mcp23107 board cannot use any other gpio numbers as it is fixed. I’m happy to help out if you need any advice mate.