Install button python scripts and python scripts audiophonics display saber v3 of raspberry p2-p3
Step 1:
volumio2 currently installed ver 2,114
Step 2:
Install the latest .deb file of rpi.gpio by: archive.raspberrypi.org/debian/ … /rpi.gpio/
Currently “0.6.3 ~ jessie-1_armhf.deb” and build wget as below.
cd /home/volumio
wget https://archive.raspberrypi.org/debian/pool/main/r/rpi.gpio/python-rpi.gpio_0.6.3~jessie-1_armhf.deb
sudo dpkg -i python-rpi.gpio_0.6.3~jessie-1_armhf.deb
Step 3:
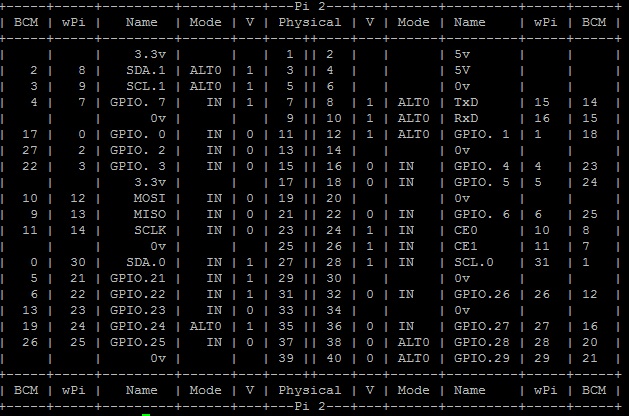
Test GPIO with this
gpio -g readall Step 4:
Create sds.sh script
sudo nano /home/volumio/sds.shAfter you open an empty black window
enter this
#!/bin/bash
#Gestion du bouton d'alimentation
echo "Audiophonics Shutdown script starting..."
echo "Asserting pins : "
echo "ShutDown : GPIO17=in, set to Low"
echo "BootOK : GPIO22=out, set to High"
gpio -g mode 17 in
gpio -g write 17 0
gpio -g mode 22 out
gpio -g write 22 1
while [ 1 ]; do
if [ "$(gpio -g read 17)" = "1" ]; then
echo "ShutDown order received, RaspBerry pi will now enter in standby mode..."
sudo shutdown -h -P now
break
fi
/bin/sleep 0.25
done
exit 0
After entering the script, save it with Ctrl + O and exit with ctrl + X
Step 5:
Set attributes in sds.sh
sudo chmod 755 /home/volumio/sds.shStep 6:
Init.d create a service that starts at the 'start-up script
sudo nano /etc/init.d/sdsdAfter you open an empty black window
enter this
[code]#!/bin/sh
BEGIN INIT INFO
Provides: sdsd
Required-Start: $remote_fs $syslog
Required-Stop: $remote_fs $syslog
Default-Start: 2 3 4 5
Default-Stop: 0 1 6
Short-Description: ON/OFF switch
Description: This deamon is used to monitor the ON/OFF button state via GPIO
END INIT INFO
Change the next 3 lines to suit where you install your script and what you want to call it
DIR=/home/volumio
DAEMON=$DIR/sds.sh
DAEMON_NAME=sdsd
Add any command line options for your daemon here
DAEMON_OPTS=""
This next line determines what user the script runs as.
Root generally not recommended but necessary if you are using the Raspberry Pi GPIO from Python.
DAEMON_USER=volumio
The process ID of the script when it runs is stored here:
PIDFILE=/var/run/$DAEMON_NAME.pid
. /lib/lsb/init-functions
do_start () {
log_daemon_msg “Starting system $DAEMON_NAME daemon”
start-stop-daemon --start --background --pidfile $PIDFILE --make-pidfile --user $DAEMON_USER --chuid $DAEMON_USER --startas $DAEMON – $DAEMON_OPTS
log_end_msg $?
}
do_stop () {
log_daemon_msg “Stopping system $DAEMON_NAME daemon”
start-stop-daemon --stop --pidfile $PIDFILE --retry 10
log_end_msg $?
}
case “$1” in
start|stop)
do_${1}
;;
restart|reload|force-reload)
do_stop
do_start
;;
status)
status_of_proc “$DAEMON_NAME” “$DAEMON” && exit 0 || exit $?
;;
*)
echo “Usage: /etc/init.d/$DAEMON_NAME {start|stop|restart|status}”
exit 1
;;
esac
exit 0[/code]
After entering the script, save it with Ctrl + O and exit with ctrl + X
Step 7:
Set attributes in sdsd.sh
sudo chmod 755 /etc/init.d/sdsdStep 8:
Install the script
sudo update-rc.d sdsd defaultsIf all went well the audiophonics button will work.
Now we install OLED
Step 1:
sudo nano /home/volumio/16x2_oled_volumio.pyAfter you open an empty black window
enter this Warning to change the following # Define GPIO to LCD mapping LCD_D7 = 27 per V3 LCD_D7 = 15 per V2
16x2_oled_volumio.py in attachment.zip
After entering the script, save it with Ctrl + O and exit with ctrl + X
Step 2:
Try the script
sudo python /home/volumio/16x2_oled_volumio.py Step 3:
Install the script at start
sudo nano /etc/rc.localInsert before “exit O”
python /home/volumio/16x2_oled_volumio.py &
After entering the script, save it with Ctrl + O and exit with ctrl + X
That’s all .
This procedure is the synthesis of what I have searched the net and I thank mainly:
Nicho e Vince69 user forum audiophonics.fr
Saluti gmarconi2
16x2_oled_volumio.zip (2.16 KB)


