In case you are referring to a HiFiBerry DAC+ Pro: No! L-GND-R (“Left”-“Ground”-“Right”) is an analog speaker output! Don’t use these holes for connecting the IR receiver.
Have a look at my earlier post and follow the link for an example of how to connect an IR receiver (sensor) to a Pi.
over looking at the photo above, showing the (GPIO config) in volumio do I just set the GPIO pin to 25 inorder to connect the IR sensor to the GPIO 25 pin.
![1.PNG|690x329]
So, i just set the IR remote profile and save.
As for the GPIO configuration, do I just set the GPIO pi of the IR Receiver to #25 and on the board, I just connect the Signal on the IR sensor to the GPIO25 pin on the Raspberry Pi 4 and no worry about config since Volumio has the IR receiver plugin
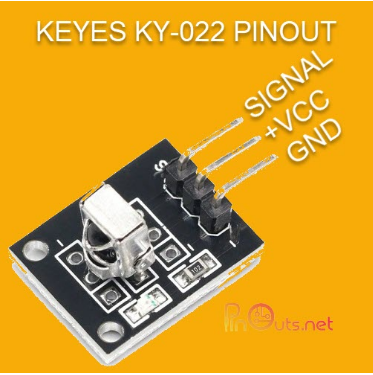
Signal GPIO25
Volt 3.3v
Ground
The way i see it, after setting the GPIO pin to 25 of the IR receiver on the volumio plugin
I can connect the 3.3v and ground and still be able to connect my RemotePi board
Sorry, GPIO 25 is physical pin 22 of the header. I corrected my post above. The pin is highlighted in this scheme.
Do you have a RemotePi board installed?
If you want to use a RemotePi board and therefore install the remotePi plugin, you will not have the option to select the GPIO on the configuration page of the IR Controller plugin.
This is because the remotePi plugin assumes that you will use the IR sensor built into the RemotePi board and already loads the gpio-ir overlay configured either for GPIO 17 or GPIO 18. Reason is that the built in IR sensor of the RemotePi board is designed to receive IR signals either on GPIO 18 (default) or GPIO 17 (after a small hardware modification).
When using a RemotePi board alongside a HiFiBerry DAC+ Pro, the RemotePi board has to be modified to use GPIO 17 as described here (see paragraph “Changing the GPIO port for the RemotePi Board IR Receiver from 18 to 17”). Accordingly on the remotePi plugin’s configuration page the toggle for using GPIO 17 has to be set.
So: If you use a RemotePi board don’t install another IR sensor but utilize the one that comes with / on the RemotePi board.
I found your other thread where your RemotePi board is visible. Looking at your pictures in that thread the RemotePi you have doesn’t seem to be the model shown in post #223, but this model with external IR and LED.
This variant of the RemotePi board comes with external IR receiver and LED cable assembly which appears to be connected on the picture you posted. So you should already be ready to go hardware wise - at least if you have done the mentioned hardware modification to the RemotePi board.
On the software side you would only have to
install the remotePi plugin, enable “Use GPIO port 17 for IR receiver” and reboot.
install the IR Controller plugin and choose your remote control.
went here and set the GPIO pin of the Receiver to GPIO24 and then used a raspberryPi 4 GPIO chart to see what pin to locate and connected the IR sensor to GPIO24 and once it The IR sensor was connect and the GPIO configuration was set to 24 i restarted the system and then tried the remote. For a few second, i tried volume button up/down and that worked there for a second and once more i reconnected the power cord let it boot and tried the up/down vol and it work, but only for a few second and stops no more and anything else.
So i restarted Volumio when setting the GPIO pin number on the configuration and connected the IR sensor to the same pin and restarted it all, that when i thought i had it. the volume only work there for a second and stopped.
I assume currently you don’t have the RemotePi board installed. Is that correct?
To check if IR signals are still received when volume control cuts out, run
cat /dev/lirc0
Pressing keys on the remote control should generate weird looking signs.
You can also run
irw
When you press a key on the remote control, the button name assigned to this key in the lircd.conf for the particluar remote control should show up. E.g. for volume up on the JustBoom remote the output should contain “Volume-Up”.
I decided to remove the wires connecting the screen to the PI and power both via MicroUSB. To try and simplify, and I also removed the HiGiBerry for the same reason, and changed the audio to use the headphone out.
I wired the IR sensors ground w a black wire, the v3 with red and the out with brown.
Then I ran the Red wire to a 3.3v and later a 5v connector. I hooked the ground up to one of the grounds, and tried both GPIO 25 and also GPIO 12 with the remote and no go. I even swapped in a new battery to the A1294.
The Pi is 3.3V device, so 5V could damage the Pi’s GPIO inputs. According to the data sheet the max. voltage on the IR receiver’s output is Vs +0.3V, i.e. 5.3V, if you use 5V to power the receiver. So I would use only 3.3V to power the IR receiver or one would have to add an appropriate resistor between the IR receicers output and the Pi’s input it is connected to.
I suggest to connect the IR receiver to 3.3V again and its output to another GPIO, e.g. GPIO 17. Set this input on the config page of the IR Controller plugin and test.
Changed it back to Apple A1294 SSH’d into the device and used your command and hit a few buttons on the Apple remote. It appears there is something happening as I got scribbly scrawl
This is where I currently am stuck. Any suggestions welcomed.
Also should mention that on the chance I’d fried the 1st IR Sensor, I swapped in a new one at the start. I also am using the most recent version of the Volumio software.
No, the sensor can take 5V, but not the Pi’s input.
This shows the remote control as well as the IR sensor are working.
To check if the signals received from the remote control are interpreted as the buttons assigned in the lird.conf file of the “Apple Remote A1294” profile you can run
irw
and watch the output while pressing buttons on the remote.
But I suspect, you will see no output. IIRC Apple A1294 remotes are known to not all work with the profile that is present in the selection of the IR Controller plugin.
Maybe, but the A1156 has/had the same issue that not all of them work with the same profile - that’s the reason why there is already an alternative profile
You could also try to create an alternative profile for the A1294 where you use a copy of the “lircrc” file from the current profile and a new “lircd.conf” file with the following content:
This has been posted in June 2019 by @ezaul. I have no Apple remotes so I can’t comment on if it would work.
For additional information on placing your own remote control profiles have a look at post #195.
Edit: Added “end remote” at the end of the code block, which appears to be missing also in the original post of ezaul where I copied it from
Edit 2: Added link to ezaul’s post. Don’t use the commands you find in that post below the lircd.conf code block. They are not necessary using the IR Controller plugin and the new option to place custom profiles in “/data/INTERNAL/ir_controller/configurations”.
Just found a post of @illtrick reporting a working “lircd.conf” file for the A1294.
I have copied the content of the “lircd.conf” file linked in that post and adapted some button names so it fits the “lircrc” of the current A1294 profile:
# Please make this file available to others
# by sending it to <lirc@bartelmus.de>
#
# this config file was automatically generated
# using lirc-0.9.0(default) on Tue Jun 2 22:56:05 2015
#
# contributed by DBMandrake
#
# brand: Apple
# model no. of remote control: A1294 (silver)
# devices being controlled by this remote:
#
begin remote
name Apple_A1294
bits 8
flags SPACE_ENC|CONST_LENGTH
eps 30
aeps 100
header 9140 4510
one 633 1666
zero 633 537
ptrail 631
repeat 9137 2220
pre_data_bits 16
pre_data 0x77E1
post_data_bits 8
post_data 0x2C
gap 108756
toggle_bit_mask 0x0
ignore_mask 0x80ff
begin codes
KEY_UP 0x50
KEY_DOWN 0x30
KEY_LEFT 0x90
KEY_RIGHT 0x60
KEY_ENTER 0x3A 0xA0
KEY_MENU 0xC0
KEY_PLAY 0xFA 0xA0
end codes
end remote
If you find your config working, would you mind to post it here? I could possibly create a PR on Volumio’s Github pages for an alternative A1294 profile.