Basic WEB UI password protection

I’ve searched far and wide all over the internet for a way to set a password for the web UI, but couldn’t find anything. The solutions were either no longer supported in Volumio 3 version, or the topics had zero replies regarding this issue.

So, with my limited programming knowledge and some googling, and experimenting, I’ve managed to finally make Volumio’s WEB UI password protected with nice little popup window to enter the password:
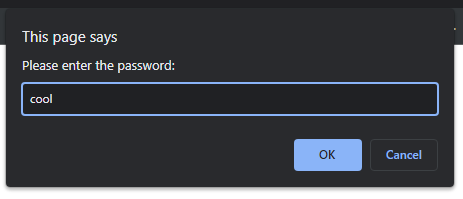
p4UvylL

I’ve used the code form Stack Overflow: (Simple Password Javascript Code? - Stack Overflow):

<script language="JavaScript">

var pass_entered;
var password="cool";

while (pass_entered!=password) {
    pass_entered=prompt('Please enter the password:','');
}

self.close();

</script>

In the code you can set your desired password on the variable “password”.

Finally, I’ve placed that little script into the header section of existing index.html file, found in “/volumio/http/www/” and it worked like a charm!

Few notices:

  • the security level of this type of password protection is most likely very very low, since the password is embeded in the code directly;
  • while it did work fine accessing WEB UI on PC using Chrome and Firefox, I did experience some issues entering the password on my phone, needing to enter the password 2-3 times over again;
  • since I added the code to the Classic theme’s index.html file, it is tied to that theme only. That means if you change the theme on the WEB UI, you no longer are asked to enter the password;
  • I’m not sure how the system will react when an update comes by, after edditing some files. Hopefully it won’t break dramatically :crossed_fingers:.

Feel free to share your thoughts on how this could be improved! :blush:

1 Like

This is like no password just read the html and you have the password
You only could get that volumio would not update any more because of it.

1 Like

True, but at least for my case, this level of ‘security’ is enough :sweat_smile:
If Volumio won’t update anymore, than I guess I’ll just wait until something starts bugging out in older versions, or some major update drops and then just reflash it.

There are ways to scrable the password :stuck_out_tongue: in js now it is to eazy to pick it out of the html
Since this is the latest thread i found asking for a password for the WebUI, i’m posting my solution here:

First we need Nginx and apache2-utils.After that we set a password and a username:

sudo apt-get update
sudo apt-get install apache2-utils nginx
sudo htpasswd -c /etc/nginx/.htpasswd **Username**

Now,install and activate the nginx-proxy:

sudo nano /etc/nginx/sites-available/volumio

Insert the following code (replace your-domain.com with your IP or hostname):

server {
    listen 80;
    server_name your-domain.com;  

    location / {
        proxy_pass http://localhost:3000;  
        proxy_set_header Host $host;
        proxy_set_header X-Real-IP $remote_addr;
        proxy_set_header X-Forwarded-For $proxy_add_x_forwarded_for;
        proxy_set_header X-Forwarded-Proto $scheme;
        auth_basic "Restricted Access";
        auth_basic_user_file /etc/nginx/.htpasswd;
    }
}

Activate this configuration and restart Nginx:

sudo ln -s /etc/nginx/sites-available/volumio /etc/nginx/sites-enabled/
sudo systemctl restart nginx

Now, we need to clear the iptables rules, (port 80 is currently redirected to 3000 , which we don’t want):

sudo iptables -t nat -F

edit:
to block port 3000 we need two more iptable rules (only accept connection over localhost):

sudo iptables -A INPUT -p tcp --dport 3000 -j DROP
sudo iptables -I INPUT -p tcp -s 127.0.0.1 --dport 3000 -j ACCEPT

et voilà! fertig! ready! have fun!

Hello,

Where in here do you set the password?

Thanks.

At this point:

sudo htpasswd -c /etc/nginx/.htpasswd **Username**

Do I just replace “.htpasswd” with the password?

no, just enter the command with your selected username. it asks you about your pwd afterwards

1 Like

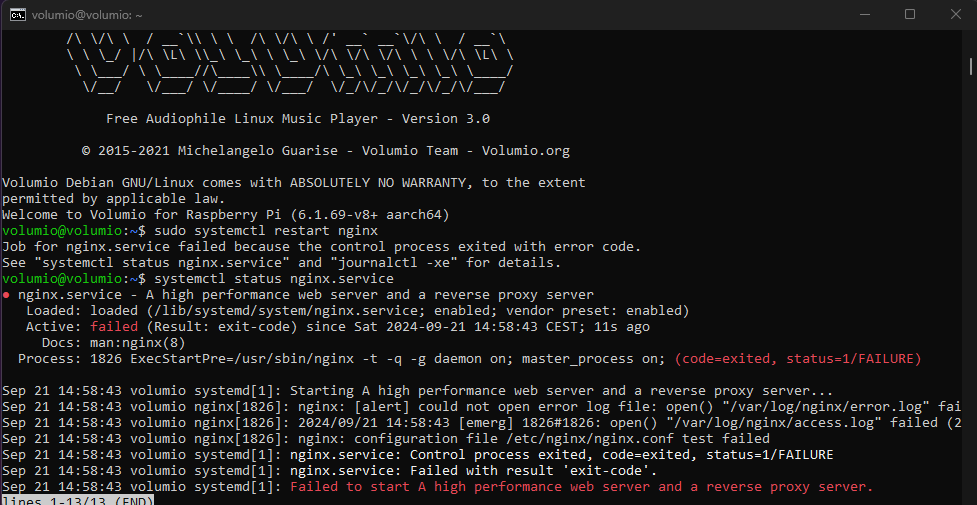
This does indeed work. But when I shut down or restart my volumio device it won’t run ngnix and it doesn’t ask for username and password anymore. When I try to execute the restart command for ngnix in my terminal i get an error:

Failed to start a high performance web server and a reverse proxy server.

After researching around it seems that the problem is that something is occupying port 80. When I execute the command to see what is on the port 80 I get the ip adress of my Volumio device.

It seems strange to me that it works fine until I restart the device. If someone has the solution for this please let me know. Thanks.

i’m just back at home to test this on monday but it might be that the iptables rules are not persistant?

Or maybe nginx is not Set to autostart/enabled?

You could try: sudo systemctl enable nginx

I will try this when I get home. I will get back to you. Thanks!

Still the same issue :frowning_face: and one more thing here is a screenshoot of my terminal:

And one more strange thing is that after the restart if I want to get ngnix to work again I have to nuke my Volumio installation in order to get it working again.

Update: So I found the root of the problem it seems that nginx always deletes nginx folder in /var/log/ directory when it’s restarted or powered on again so because of that I get this error.

I don’t know why it keeps doing that?

wow… i had to try a bit and am currently wondering why it worked in the beginning. i got it working back after some errors (see the deleted post). problem was, that the log-folder for nginx wasnt saved and nginx couldnt start. i let the folder get created at start:

Create a systemd tmpfiles configuration to automatically create the directory at boot:

sudo nano /etc/tmpfiles.d/nginx.conf

Add the Following Content

d /var/log/nginx 0755 www-data www-data

This tells systemd to create the directory /var/log/nginx with permissions 0755 and ownership www-data:www-data at boot time.

Reload systemd-tmpfiles

sudo systemd-tmpfiles --create


the iptables have to be persistent. i tried with iptables-persistent, but it fires to early. volumio creates its rules after it, so i had to do this with a service. if anyone has a better approach, i would be glad.

sudo nano /usr/local/bin/flush_nat_table.sh

adding the iptables:

#!/bin/bash

# iptables rules
iptables -t nat -F
iptables -A INPUT -p tcp --dport 3000 -j DROP
iptables -I INPUT -p tcp -s 127.0.0.1 --dport 3000 -j ACCEPT

make it executable and creating a systemd-service:

sudo chmod +x /usr/local/bin/flush_nat_table.sh
sudo nano /etc/systemd/system/flush-nat-table.service

adding following code:

[Unit]
Description=Flush NAT table at startup
After=volumio.service
Wants=volumio.service

[Service]
Type=oneshot
ExecStart=/usr/local/bin/flush_nat_table.sh

[Install]
WantedBy=multi-user.target

daemon-reload,enable and start:

sudo systemctl daemon-reload
sudo systemctl enable flush-nat-table.service
sudo systemctl start flush-nat-table.service

i don’t know how to edit the above instructions to have all at one place… sorry
can you please test this. it works here. but i had some drawbacks with another solution. so i would really appreciate feedback

Without creating an installation script there is not much of a one-liner, based on the file creation. you can try something like this. Every block is 1 copy/paste/run statement:

As a root (not sudo, root)
su

cat >> /usr/local/bin/flush_nat_table.sh <<EOL
#!/bin/bash

# iptables rules
iptables -t nat -F
iptables -A INPUT -p tcp --dport 3000 -j DROP
iptables -I INPUT -p tcp -s 127.0.0.1 --dport 3000 -j ACCEPT
EOL
cat >> /etc/systemd/system/flush-nat-table.service <<EOL
[Unit]
Description=Flush NAT table at startup
After=volumio.service
Wants=volumio.service

[Service]
Type=oneshot
ExecStart=/usr/local/bin/flush_nat_table.sh

[Install]
WantedBy=multi-user.target
EOL

exit

sudo chmod +x /usr/local/bin/flush_nat_table.sh; sudo systemctl daemon-reload; sudo systemctl enable flush-nat-table.service; sudo systemctl start flush-nat-table.service